
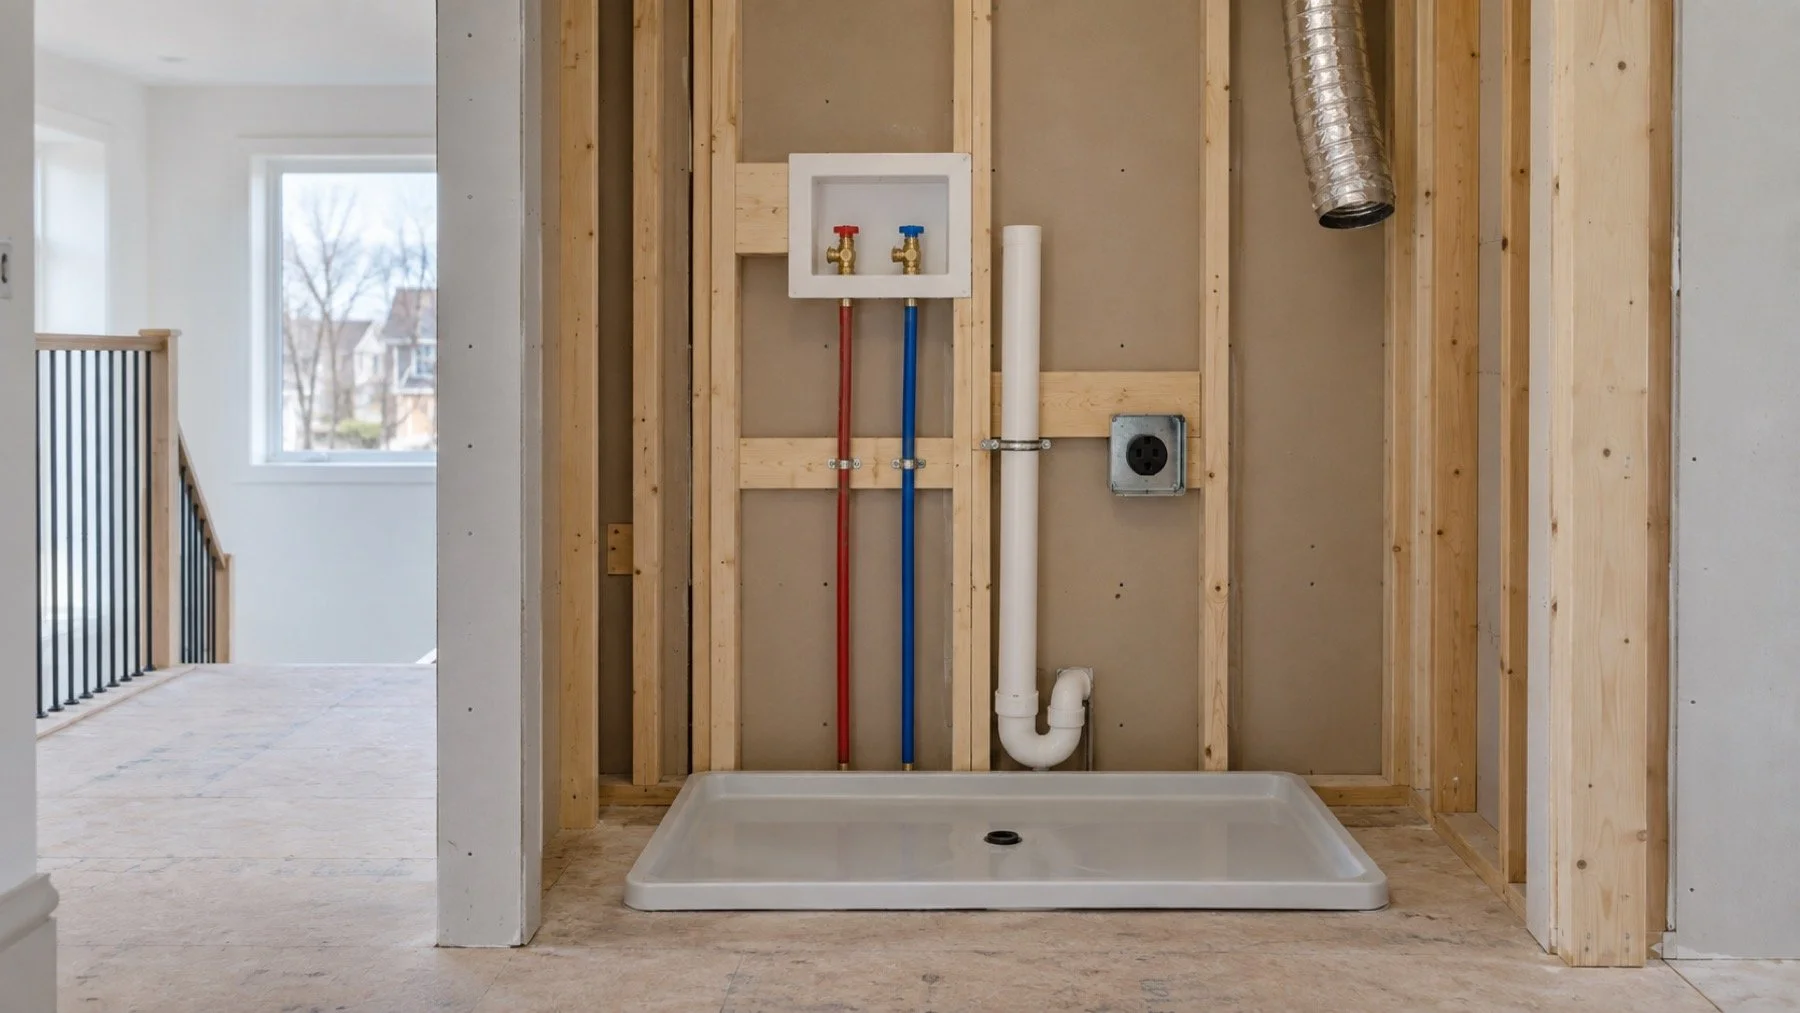
Moving the washer beside the bedrooms changes more than convenience. The drain, vent, water supplies, shutoff, floor protection, appliance clearance, and structure all have to fit in one upper floor location.
We start below the proposed room. The most direct path to an adequately sized drain and vent may cross joists, finished ceilings, or a room where access is difficult. The machine footprint matters, but the building route usually decides whether that footprint works.
A second floor laundry needs a correctly sized and sloped drain, a vent, a reachable shutoff and a way to catch a leak, so the floor structure usually decides where the machines can go.This checklist follows the rough in from layout to final testing and keeps product choices tied to verified manufacturer instructions.
The upstairs laundry rough in sequence
Confirm the machines and finished layout
Record the washer and dryer dimensions, door swing, service clearances, hose connections, and whether the units stack. Include cabinets, a laundry sink, counter depth, and the finished floor build up. A rough opening based on nominal appliance width can miss the space needed for hoses and valves.
Place the shutoff where an adult can reach it without moving a full machine. Keep access in the final millwork design, not only on the plumbing drawing.
Trace the standpipe, trap, drain, and vent
The washer discharge enters a standpipe and trap before joining the drainage system. The route must maintain the required size, slope, and venting for the actual layout. Long horizontal offsets and tight joist spaces can change the chosen location.
Follow the path to a known connection instead of assuming the wall below contains a suitable stack. An inspection opening or selective access may be needed to confirm existing work.
Protect the structure before drilling
Floor joists and beams limit hole size and location. Engineered members follow manufacturer rules, and field alterations may need structural review. The drain cannot simply take the shortest diagonal route if that route damages the framing.
Coordinate plumbing holes with ducts, wiring, blocking, and fasteners. Mark approved routes before several trades begin working in the same bay.
Plan for a leak without promising containment
A pan, drain, water alarm, and accessible shutoff can reduce consequences, but the exact requirement and useful arrangement depend on the code, the machine, and the room. A pan does not catch a failed supply line spraying beyond its edge, and a drain does not replace supervision or maintenance.
Use braided hoses or other components only as specified by the appliance manufacturer and plumbing design. Keep connections visible enough to inspect for corrosion, abrasion, or seepage.
Test before the ceiling below is closed
Pressure test water lines, test drainage, verify the shutoff, and run the selected machine through its discharge cycle after installation. Watch the standpipe connection and the ceiling below. A slow leak can appear only when the pump discharges at full flow.
Photograph concealed piping with measurements from walls and fixed framing. Leave the homeowner a simple shutoff location and maintenance note.
Begin with the load path below the machines
A washer is heavy before water and clothing are added, and its spin cycle creates movement. The floor assembly, joist direction, span, openings, and finished buildup all influence where the machines can sit and how the pipes can reach them. A convenient alcove on the floor plan may land above a beam, open room, stair, or ceiling detail that leaves no practical drain route.
Ask the structural designer where penetrations are allowed before drilling or notching. The drain needs grade, the vent needs a permitted route, and the supplies need support and protection. Grouping these services beside a suitable wall can preserve structure and simplify access. Moving the machines a small distance on paper can avoid a large ceiling bulkhead below.
Record the exact appliance dimensions, door swing, pedestal height, connection locations, and service clearance. A stacked pair, side by side pair, or laundry centre changes the box height and reach. The shutoffs and standpipe should remain accessible after the appliances are installed, not hidden where the washer has to be disconnected before water can be turned off.
Build the drain and vent around real discharge
The washer drain enters a standpipe, then a trap and branch sized and arranged for the applicable code and appliance. The standpipe height, trap location, branch grade, vent connection, and tie in to the building drain all need to work as one system. A hose pushed into an improvised pipe does not establish a compliant or reliable connection.
The route below the laundry matters as much as the wall box. Identify which drain receives the branch and what else connects to it. If a nearby bathroom or kitchen is part of the proposed route, review the complete fixture group rather than assuming the shortest physical distance is the best connection. Existing pipe condition and access can change the plan.
During testing, observe a full discharge rather than only running a little water from a bucket. Watch the standpipe, trap, branch, and accessible joints. Listen for air movement or nearby trap disturbance. Keep the work exposed until the required inspection and test are complete, then photograph the route before insulation and drywall hide it.
Plan for the leak that happens when nobody is watching
A pan can catch a limited leak at the appliance, but it needs an appropriate destination and it cannot contain every supply hose failure or drain backup. A floor drain, pan drain, leak alarm, automatic shutoff, and waterproof finish each address different events. Choose them as a coordinated risk plan instead of treating one accessory as complete protection.
Use reachable quarter turn shutoffs or the approved control supplied for the installation. Label them and test them during turnover. Protect hoses from kinks and sharp edges, and leave enough space to inspect connections without pulling the machine into a hallway. If an automatic shutoff is selected, confirm sensor placement, power, reset steps, and how the owner will know it has operated.
Think about the rooms below. A leak above a kitchen, finished ceiling, or electrical equipment can create more disruption than the same leak over an unfinished utility room. Share that layout with the plumber and general contractor. The final decision balances convenience near bedrooms with structure, drainage, noise, service access, and the consequence of water leaving the laundry enclosure.
Treat noise and vibration as layout inputs
A second floor laundry can send sound through framing even when the pipes do not leak. Machine levelling, floor stiffness, supply support, drain support, isolation, and contact with cabinets or walls all influence what reaches the rooms below. Give the machines a stable floor and the piping enough secure support without fastening it where vibration will be transferred unnecessarily.
Plan the alcove so appliance feet can be adjusted and the unit can be pulled out without tearing a pan, hose, trim, or door casing. Confirm dryer and electrical coordination with the appropriate trades at the same time. The room must accommodate the complete appliance installation, not just the plumbing box shown on an early plan.
At turnover, run a drain and spin cycle while someone listens in the adjacent and lower rooms. Check that hoses remain clear, the standpipe connection stays stable, and the machine does not walk. Correcting access, support, or levelling before built in doors and shelves are installed is far easier than reopening a finished laundry.
A useful laundry rough in handoff
Keep the appliance specifications, plumbing route photos, valve and leak control instructions, pan or drain details, test record, and the location of concealed connections. Show the owner how to close the laundry water, what an alarm means, and how to reach the cleanout or service points without moving built in storage.
Send Seal Plumbing the floor plan, joist information, room below, machine specifications, and current construction stage before the route is fixed. That review can identify whether the preferred location has a workable drain, vent, supply, access, and leak response plan while the framing is still open.
Balance convenience with the complete route
The best upstairs laundry location is the one that balances daily convenience with a defensible route for drainage, venting, supply, structure, access, noise, and leak response. If one of those pieces has no answer while the framing is open, the location decision is not finished.
Plan the service route through the house as well. Replacing a washer, cleaning a pan, or repairing a valve should not require removing a finished door frame or carrying water across unprotected flooring. Confirm door width, landing space, stair turns, and a place to pull the machines forward. These are not plumbing code dimensions, but they affect whether the approved shutoffs and connections can actually be maintained. The best rough in remains reachable after the appliances, trim, and storage are complete.
Coordinate the laundry with the rooms around it
The laundry location should be reviewed with the residential design and drainage history.
Ontario put its 2024 Building Code into effect on January 1, 2025. The laundry drain and vent arrangement must be checked against the code that governs the permit. Ontario Building Code information.
Code aware next step for an upstairs laundry
Send the appliance specifications, floor plan, photos of the room below, and framing information. Seal Plumbing can review the rough in route before finishes begin.